

What Does The Difference Blend Mode In Photoshop Mean
If you google "Photoshop Blending Modes," you're going to get a lot of technical tutorials that may be hard to understand. As information technology happens, these powerful tools that we can utilise to create incredible, textured composites are adequately easy to use. To simplify things, we made what nosotros are calling "the Ultimate Visual Guide" to agreement Photoshop blending modes so that you tin speedily create your own neat composite images with textures.
Video: The Ultimate Visual Guide to Understanding Photoshop Blending Modes

Guide to Understanding Photoshop Blending Modes: Table of Contents
- Introduction: Creating Textures
- Understanding Composite Images and Photoshop Blending Modes
- Working with Different Blend Modes
- Normal
- Deliquesce
- Exploring Darken Blend Modes
- Darken
- Multiply
- Color Burn
- Linear Fire
- Darker Colour
- Using Lighten Blend Modes
- Lighten
- Screen
- Color Dodge
- Linear Dodge
- Lighter Color
- Playing with Contrast Blend Modes
- Overlay
- Soft Light
- Hard Light
- Vivid Light & Linear Light
- Pin Light & Hard Mix
- Incorporating Inversion Blend Modes
- Departure and Exclusion
- Subtract and Divide
- Blending with Component Blend Modes
- Hue, Saturation, and Color
- Luminosity
- Decision and More Information
1. Introduction: Creating Textures
To create Photoshop textures, we first with basic arts and crafts papers. Then, nosotros physically crumple them, scratch them, tear them, and fifty-fifty low-cal them on fire to create unique and interesting textures. At that indicate, we and then digitize the papers into xx+ megapixel loftier-resolution files. All of the textures featured in the video higher up and the commodity beneath (plus over 200 more) are included in our Photoshop Paper Texture Pack. Nosotros designed these handmade, high-resolution textures to take your photography to the side by side level. You tin can, yet, create your own as well for the purposes discussed in this article.
2. Understanding Composite Images and Photoshop Blending Modes
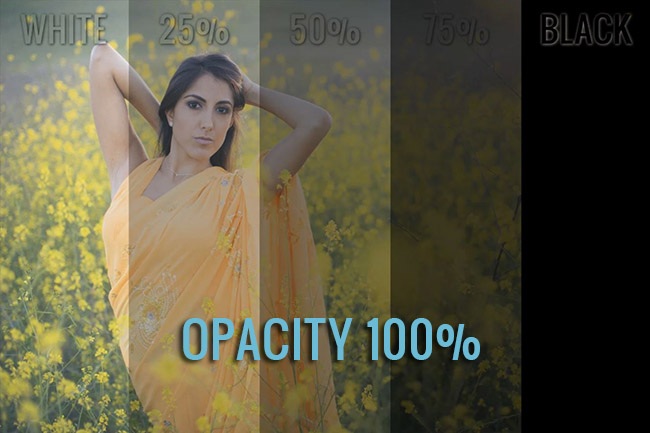
Texturing refers to the process of placing a texture epitome over a photo and blending the layers to create a blended. To demonstrate, nosotros take a WtB (White to Black) test image with White, 25% Grey, 50% Greyness, 75% Grey, and Black, which we volition layer over our photo so we tin can evidence you lot exactly how the different Photoshop Blending Modes work in practice.

When nosotros choose a Photoshop Blending Style, we are substantially asking Photoshop to blend our selected layer with the layer below based on whatever Blend Mode is selected. So essentially, depending on the mode, pixels from the acme layer are going to alter the colour and luminosity of those on underlying layers. This will brand more sense as nosotros continue with our demonstrations.
Right now, lets take a await at the bachelor Photoshop Blending Modes, which are located in the "Layers" tab in Photoshop. See in the epitome beneath for more details. When y'all showtime await at the alloy options, you might be overwhelmed by the choices. However, they're actually separate up into 6 piece of cake groups. Each of these groups accept Blend Modes that operate similarly in function. If you want to alternate between the different Blend Modes you lot can press "Shift +" or "Shift -" to cycle through them rapidly.

3. Working with Different Blend Modes
Normal Blend Mode
At 100% Opacity the default, the "Normal" Alloy Style simply shows the paradigm on meridian, and we can't meet annihilation underneath it. When we drag the Opacity down to fifty%, the selected layer becomes more than transparent, which allows us to encounter the image below.

However, the Normal Blend Mode isn't really "blending" the two layers together. Instead, it'southward only making the selected layer more transparent. This, in plough, reveals the layers below. Just, fifty-fifty though information technology isn't technically "blending" pixels, information technology is still a very effective tool when making composite images. So, when we drop our opacity on the White to Black layer down to 50%, we can still see all of the tones, only we see them at 50% opacity.
Deliquesce Blend Mode
When we choose the Deliquesce alloy option, the pixels volition dissolve or granulate when we lower the Opacity of the top layer image. You may wonder why it is considered a "normal" Blend Fashion when the effect is quite strange. But once once more, the Dissolve Blend Way isn't actually "blending" pixels it is again simply selecting areas to reveal versus areas to conceal. This is why it is also in the Normal Alloy Fashion grouping.

At a low Opacity the Dissolve Blend Way is useful when you desire to create granulated or grainy effects over an image or layer.
[Related Reading: How To Have A Unmarried Portrait & Create Numerous Looks Using Photoshop Blending Modes]
4. Exploring Darken Alloy Modes
When using Darken Alloy Modes, white is our neutral signal. This means that annihilation that is darker than pure white is going to darken the image below to varying degrees all the way to full black. In all of the sample images below, you will see that white area in the White to Black (WtB) layer isn't affecting the image layer below.
Darken Blend Mode
All of the Photoshop Blending Modes in the Darken group are going to darken the layer below with varying degrees of contrast/tonality. In the Darken grouping, white is your neutral colour. So basically, if the selected layer has white, this volition not affect or darken the layers beneath. This makes sense because how would you darken with white after all? Annihilation though that is a darker tone than pure white on your selected layer volition brainstorm to darken the layer beneath.

Using the standard "Darken" blend manner in the Darken Grouping, we can run across that at 100% opacity, anything that isn't white is pulling down the tones of the underlying image in a very linear fashion. Because information technology is and then linear, we by and large don't use the Darken Blend Mode at a high opacity because it is simply too overpowering. But, when backed off to 65%, yous tin can see that it has a much more gradual affect over the underlying epitome, and it can actually be quite useful in creating sort of a darkened and faded look as y'all can see in the prototype above.
Multiply Alloy Manner
The Multiply Blend Manner combines the contrast and the luminosity of the top and bottom layer together, which ranks it among the most useful Photoshop Blending Modes that we utilize frequently in compositing. With the WtB layer shown below at 100% Opacity, we can run across the epitome layer clearly up until we meet the full black tone darkening the image completely.
We can also run across that the Multiply Blend Fashion creates far more prototype contrast virtually noticeable in the 25-75% range when compared to the standard Darken Blend Mode. Expect to the Multiply Blend Mode when you want to darken AND add contrast to your underlying layer.
Color Burn Alloy Mode
The Colour Fire Blend Mode is concealment the image beneath, and it does that by essentially adding contrast and called-for the colors downwards. This gives our epitome a very high dissimilarity burned look. At 100% Opacity the Black is completely night, but when you lower the Opacity of the WtB layer to fifty% information technology blends much nicer.

In looking at the 50% opacity example to a higher place, yous can see over the 50% grey area just how much more than saturation and contrast is boosted with this Blend Manner than with the other Darken Blend Modes.
Linear Fire Blend Style
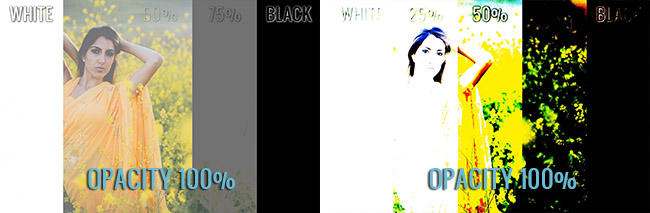
The Linear Burn Alloy Mode is some other great darkening effect that washes out the image, and one that we frequently use. It is similar to that "linear" style of burning that nosotros saw in the standard Darken Alloy Style. But, it is a little more subtle throughout which makes it an awesome blend way for creating night vintage fades. Particularly, look at the 75-100% black area in the epitome beneath. You lot can come across how it has a very pleasing darkened and faded look over the underlying layer while it still retains more dissimilarity than the standard Darken Blend Mode.

Darker Colour Blend Style
This Photoshop Blending Manner simply blends the darker colors of the selected layer, and I don't use it too frequently. When this Blend Fashion is at 100% Opacity, we see the darker Greys and Blacks existence added to the prototype. While nosotros tin can of form adjust the opacity, I prefer to use other Photoshop blending modes.

5. Using Lighten Blend Modes
The Darken Alloy Modes and Lighten Blend Modes are exact mirror opposites of each other, so you can await them to blend exactly the same way, but merely exist inverted.

Lighten Alloy Mode
In the Lighten Blend Mode grouping the Blackness becomes our neutral point, and it's not effecting anything in the layer below. Again, if we are "lightening" an image, and so you lot need brighter colors in club to do that. Then blackness is neutral, and anything brighter than black volition affect the layer below.

At 100% Opacity nosotros encounter the White adds 100% brightness, which volition simply cause the underlying layer to go white. Remember, with the Lighten Blend Mode in particular, that if the underlying layer is already brilliant to begin with, y'all will need brighter tones to actually "Lighten" the underlying layer. For this reason, nosotros can run into the 25% Grayness fairly clearly and we can barely see the edge on the 50% grayness, but annihilation darker than that is almost completely transparent. This is considering the bulk of the underlying epitome is brighter than l% Grey.
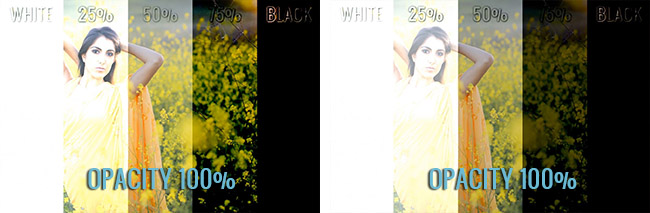
Screen Alloy Mode
With the Screen Alloy Mode we can see more of the dissimilar tones at 100% Opacity. The Black is again neutral, only we tin see the 25%, 50%, and 75% Greys making the image brighter and adding some fade to the epitome. This is a great Blend Mode for when you desire to create a brightened and faded look to an image or texture.

Color Dodge Blend Mode
The Color Dodge and Colour Burn Photoshop Blending Modes are the exact opposite of one another. This particular Alloy Fashion is brightening the epitome and calculation colors. These are powerful alloy effects and so y'all want to lower the Opacity to get a more subtle await.

Linear Contrivance Blend Mode
Linear Dodge is similar a toned down version of the Colour Contrivance Blend manner. The Color Dodge has more than contrast equally opposed to the flatter look of Linear Dodge. If you lot feel like the Color Dodge is adding also much contrast then try Linear Dodge. Again, Linear Contrivance is some other great blend mode that we are frequently using to create a bright and flat fade.
Lighter Color Blend Mode
The Lighter Color Blend mode is a footling more than ambitious in terms of applying the White areas of the peak layer to the bottom layer. At 100% Opacity we see the 25% Grey beingness blended heavily into the underlying layer, while every darker than 25% Grayness is basically transparent considering of the bright exposure of the underlying layer. Again, this isn't a alloy mode that we are frequently using.

[Related Reading: The Power Of Using Blending Modes In Photoshop | Aaron Nace]
6. Playing with Dissimilarity Blend Modes
In the Darken Blend Modes, White was the neutral point. Black is the neutral point in the Lighten Alloy Modes. In the Overlay Alloy Modes, the 50% Grey is the neutral point, and anything that isn't l% grey will add contrast and brightening, or add contrast and concealment to the layers below. Contrast Alloy Modes are very effective and oftentimes used.
Overlay Blend Mode
When using the Overlay Alloy Modes annihilation darker than fifty% Grey will darken and add contrast to the underlying image and anything brighter than fifty% Gray will brighten and add together contrast to the underlying epitome. This is one of our well-nigh oftentimes used Photoshop Blending Modes.

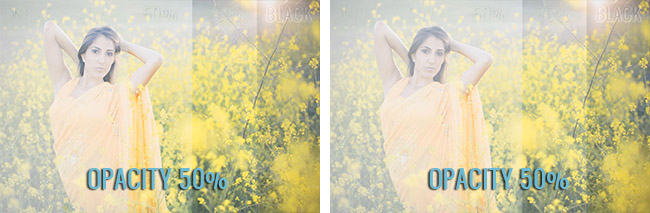
Soft Light Blend Mode
The Soft Light Blend Mode works similarly to the Overlay Blend Way, however information technology does information technology in a slightly softer and more than subtle style. The left side of the image beneath has a dainty brilliant fade being applied to the image while still retaining decent contrast, and on the right side there are some nice colors and contrast being added. You can essentially expect at this as a softer Overlay Alloy Mode and that makes it extremely effective.

Hard Light Alloy Mode
The Hard Light Alloy Mode is an aggressive Blend Mode and you lot'll want to lower the Opacity on information technology for the all-time results. At 100% Opacity the Difficult Low-cal Blend Mode keeps the Whites completely white and the Blacks completely black. In add-on, the blend isn't equally subtle and rich in showing underlying tones when compared to the Soft Lite Alloy Mode which makes it a little less useful, particularly at high opacities.

Bright Light Blend Mode & Linear Light Alloy Mode
The Vivid Light and Linear Low-cal Blend Modes add a lot more than dissimilarity than you would get in the Soft or Hard Light Blending Modes. While we utilize these blend modes (Linear Light) ofttimes in retouch, we aren't using them too oft in compositing and texturing unless we really need to add a lot of "punch" every bit they are very strong effects.
Pivot Light Alloy Way & Difficult Mix Blend Way
The Pin Light and Hard Mix Photoshop Blending Modes are quite extreme in their effect. Each substantially posterizing the color below it by destroying color graduation. These blend modes tin be constructive when yous need to create a posterized effect, merely over again we are mostly not going to be using these blend modes in texturing and composites as they are a bit likewise extreme.
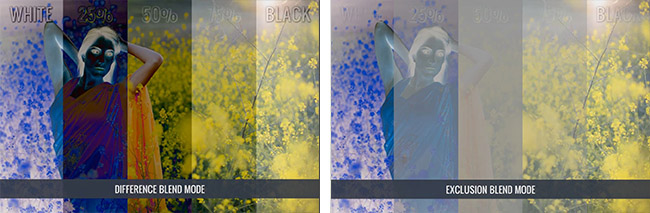
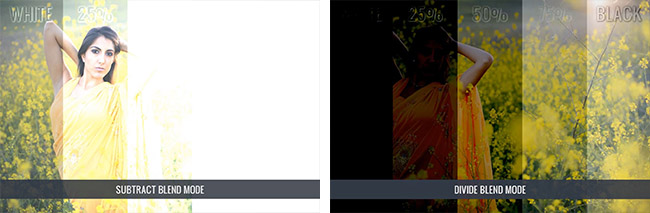
7. Incorporating Inversion Alloy Modes
These Photoshop Blending Modes are inversion or cancellation blends, because depending on the underlying layer, it'due south either going to invert or abolish out the colors. We're typically not using these for our texture pack, merely we want to show what they look similar compared to all the other Alloy Modes.
Deviation Alloy Fashion and Exclusion Alloy Mode
Decrease Blend Mode and Divide Blend Mode
8. Blending with Component Blend Modes
For the Hue, Saturation, and Color Blend Modes we're going to get a black and white prototype because the overlying paradigm has no color on information technology. With these "Component" Alloy Modes, you are getting exactly that, the component of the selected layer blended to the layer below. The first three Blend Modes in this group are "color component" blend modes and since our WtB layer has no colour, it simply turns the layer beneath to black and white every bit you tin run across below.
Hue Blend Manner | Saturation Alloy Mode | Colour Blend Mode

Luminosity Blend Mode
When we flip to the Luminosity Blend Style we see the Luminosity levels being affected on the layer below. This Blend Mode is affecting the layer and pixels below simply based on effulgence levels, and so it's basically irresolute the brightness levels on the layer below to these even tones.

These Component Blend Modes are useful when yous want to add simply the color or the brightness from a texture onto an epitome.
Conclusion & More than Information
Nosotros promise you all enjoyed this article on Photoshop Blending Modes for photographers and artistic professionals of all levels. If you'd similar to swoop deeper, our Photoshop Paper Texture pack also includes pace-by-step video tutorials to guide you along the mode. We designed the Photoshop Paper Texture pack to piece of work with hymeneals photography, fine-art photography, newborn photography, landscape photography and much more.
Source: https://www.slrlounge.com/photoshop-blending-modes/
Posted by: woodmanseenevolly.blogspot.com
0 Response to "What Does The Difference Blend Mode In Photoshop Mean"
Post a Comment